
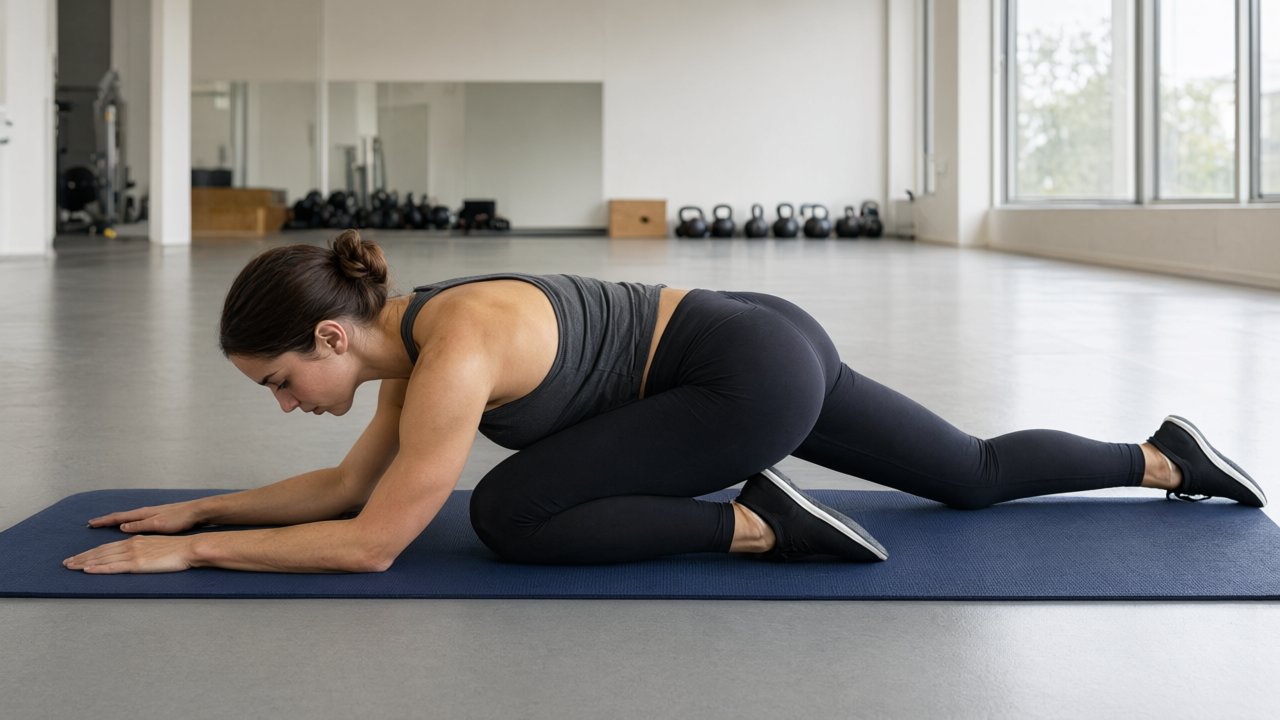
Pigeon Pose
pigeon-pose
Faites attention à
- avoid · Hip replacement (post-op) — Deep hip flexion combined with the leg rotated outward and drawn across the body is the position most likely to dislocate a new hip joint, and this exercise is built out of all three at once. Do not attempt it inside the range your surgeon has set. Instead, use Glute Bridge, which strengthens the same muscles with the hip kept in a safe arc.
- modify · Acute knee injury — The front knee sits deeply bent with bodyweight pressing through it and the shin angled across the floor, which twists the joint as well as folding it. Keep the shin more parallel to the hip, stay upright instead of folding forward, and shorten the hold. If the knee is what you feel rather than the glute, substitute 90/90 Hip Stretch, where the knee carries no bodyweight at all.
- modify · Acute lower back injury — Folding the torso down over the front leg rounds the lumbar spine under the weight of the trunk, and people push into that position precisely because it feels good on a tight back. Stay upright on the hands or forearms with the spine long and take the stretch from the hip alone. If the back settles before the hip does, substitute Wall Hip Flexor Stretch, which opens the front of the hip with the spine unsupported and vertical.
When I guide you into Pigeon Pose, I’m looking for a deep, steady release along the outer hip and glute, paired with a grounded, expansive chest. You’ll feel a gentle stretch that melts tension without sharp pain. Focus on keeping your pelvis square to the floor and breathing into the tightest corners. Let gravity do the heavy lifting while you stay soft, aligned, and fully present in the space you’re opening.
Si vous débutez
As you settle into the pose, prioritize pelvic alignment over depth. If your front knee feels sharp or pinching, slide your ankle slightly closer to your opposite hip or place a folded blanket under the front glute for support. True tension should feel like a dull, manageable pull along the outer hip, not a stabbing sensation in the joint. Stop immediately if you feel nerve pain, numbness, or sharp knee discomfort. Beginners often compensate by hiking the back hip or collapsing the chest forward too early; instead, actively press the back knee down and keep your ribcage lifted until your hips are truly level. Move with patience and consistency. Your connective tissue adapts slowly, so honor your current range and trust that daily, mindful practice will naturally unlock deeper mobility without forcing it.
Aller plus loin
Once your hips settle evenly without support, make "harder" mean longer time under tension and deeper leverage rather than added load. Hold each side for two to three minutes, using the first thirty seconds simply to breathe into resistance before allowing a millimetre-by-millimetre descent on each exhale. Pause at the point of greatest tension and stay there; forcing past it recruits guarding muscles you are trying to quiet. When sixty seconds feels routine, deepen the forward fold until your sternum rests near the mat, or reach back to catch your extended foot for a combined hip and quad stretch. You are ready to progress when both sit bones ground effortlessly and the outer hip releases without discomfort. From there, move towards Reclined Pigeon with a strap around the front foot for sustained traction, or transition into King Pigeon if your spine and shoulders permit the full bind.
Erreurs courantes
Most practitioners rush into the pose by allowing the front knee to drift too far forward, which places unnecessary torque on the knee joint and compromises the intended hip stretch. Another frequent error is letting the back hip hike upward or rotate open instead of staying square to the floor, which shifts the tension away from the glute and into the lower back. Many also collapse their upper body prematurely, rounding the spine and restricting diaphragmatic breathing before the hips have actually softened. Finally, pointing the back foot instead of keeping the top of the foot flat on the mat can create unwanted ankle strain and destabilize the entire alignment. Focus on symmetry, grounded contact, and gradual progression to avoid these pitfalls.
Routine
- Sets
- 3
- Reps
- 30-60 seconds per side
- Rest
- 90s
- RPE
- 3
- Per set
- ~120s
- Fréquence
- 3-4x/week
Gradually deepen the forward fold or reach back to catch your extended foot for a deeper quad stretch.
Cues
Muscles
- Glutes
- Hip flexors
- Adductors
- Abductors
Matériel
- Bodyweight
- 1
Start on all fours with your wrists under your shoulders and knees under your hips.
- 2
Bring your right knee forward and place it behind your right wrist, angling your shin diagonally across the floor.
- 3
Slide your right ankle toward your left hip while extending your left leg straight back, keeping the knee and top of the foot grounded.
- 4
Square your hips to the mat, pressing firmly through both sit bones to prevent leaning to one side.
- 5
Inhale to lengthen your spine, then exhale to fold forward over your front leg, resting on your forearms or forehead.
- 6
Hold the position, taking slow, deep breaths to allow the hip tissues to soften and release.
- 7
Press through your hands, lift your chest on an inhale, and return to a neutral tabletop position.
- 8
Switch sides and repeat the entire sequence with your left knee forward.